使用注解配置 IoC 容器
使用注解进行 Spring 的配置是目前最常用的方式。相比于 XML 配置文件,注解配置更加简洁明了,且易于维护。
如果同时使用 XML 和注解进行配置,XML 配置的优先级更高,会覆盖注解配置。这是由于注解注入比 XML 配置加载更早,因此 XML 配置会覆盖注解配置。
启用注解配置
要使用注解配置,首先需要在类路径中引入 spring-aop 依赖,由于 spring-context 本身已经依赖了 spring-aop,因此如果已经引入 spring-context,则无需额外添加依赖。
然后,创建如下的 XML 配置文件,引入 context 命名空间,通过 context:component-scan 指定要扫描的包。指定后,Spring 容器会自动扫描该包及其子包中的类,并根据注解进行 Bean 的注册和依赖注入。
<?xml version="1.0" encoding="UTF-8"?>
<beans xmlns="http://www.springframework.org/schema/beans"
	xmlns:xsi="http://www.w3.org/2001/XMLSchema-instance"
	xmlns:context="http://www.springframework.org/schema/context"
	xsi:schemaLocation="http://www.springframework.org/schema/beans
		https://www.springframework.org/schema/beans/spring-beans.xsd
		http://www.springframework.org/schema/context
		https://www.springframework.org/schema/context/spring-context.xsd">

    <!-- 指定要扫描的包 -->
	<context:component-scan base-package="fun.macrohard.annotation_configuration"></context:component-scan>

</beans>
下面就可以使用注解来配置 Bean 及其依赖注入了。
使用注解定义 Bean
使用注解配置 Bean 时,首先需要在类上使用 @Component 注解将其标记为一个 Bean。例如:
package fun.macrohard.annotation_configuration;

@Component(value = "fooBean")
public class Foo {
    private String bar;
    public Foo() {
        System.out.println("Foo is instantiated.");
    }
    public void setBar(String bar) {
        this.bar = bar;
    }
    public void use() {
        System.out.println("Using Foo with bar " + this.bar);
    }
}
@Component(value = "fooBean")可以简写为@Component("fooBean")。- 如果不指定
value属性,Spring 会默认使用类名的首字母小写作为 Bean ID,例如上例中默认的 Bean ID 为foo。
除了 @Component 注解之外,Spring 还提供了其他一些注解来定义不同类型的 Bean:
@Service:用于标记服务层的 Bean。@Repository:用于标记数据访问层的 Bean。@Controller:用于标记控制器层的 Bean。
需要指出,这三种注解本质上只是 @Component 的别名。例如,@Service 注解的定义如下:
@Target(ElementType.TYPE)
@Retention(RetentionPolicy.RUNTIME)
@Documented
@Component
public @interface Service {

	/**
	 * Alias for {@link Component#value}.
	 */
	@AliasFor(annotation = Component.class)
	String value() default "";

}
使用注解进行依赖注入
使用 @Value 注入简单类型
使用注解进行依赖注入时,可以使用 @Value 注解将简单类型的值直接注入到 Bean 的字段中。
提供 setter 方法时,可以在 setter 方法上使用 @Value 注解进行注入。
    @Value("bar1145141919810")
    private String bar;
使用 @Value 注解时,可以不提供 setter 方法,直接在字段上添加注解,Spring 容器会通过反射机制直接为字段赋值。
    @Value("bar1145141919810")
    private String bar;
使用 @Autowired 进行自动装配
对于复杂类型的依赖项,可以使用 @Autowired 注解进行自动装配。Spring 容器会根据类型自动匹配相应的 Bean 并注入。
@Component("vehicleBean")
public class Vehicle {}
@Component("travelBean")
public class Travel {
    @Autowired
    private Vehicle vehicle;

    public String getVehicleType() {
        return vehicle.getClass().getSimpleName();
    }
}
public class TravelTest {
    public static void main(String[] args) {
        ClassPathXmlApplicationContext context = new ClassPathXmlApplicationContext("annotation-configuration.xml");
        Travel travel = context.getBean("travelBean", Travel.class);
        System.out.println("Travel bean obtained: " + travel);
        System.out.println("Vehicle type: " + travel.getVehicleType());
        context.close();
    }
}

@Autowired 自动装配使用 @Qualifier 指定注入的 Bean
默认情况下,@Autowired 注解会 根据类型 进行自动装配。
当 Vehicle 派生出子类时,若子类也被注册为 Bean,则会出现多个同类型 Bean 的情况,Spring 容器无法确定注入哪个 Bean,从而抛出异常。
例如,假设我们新增了如下继承自 Vehicle 的类,并将其也注册为 Bean:
@Component("carBean")
public class Car extends Vehicle {}

@Component("airplaneBean")
public class Airplane extends Vehicle {}
此时,若再次运行测试用例,则会出现如下异常:
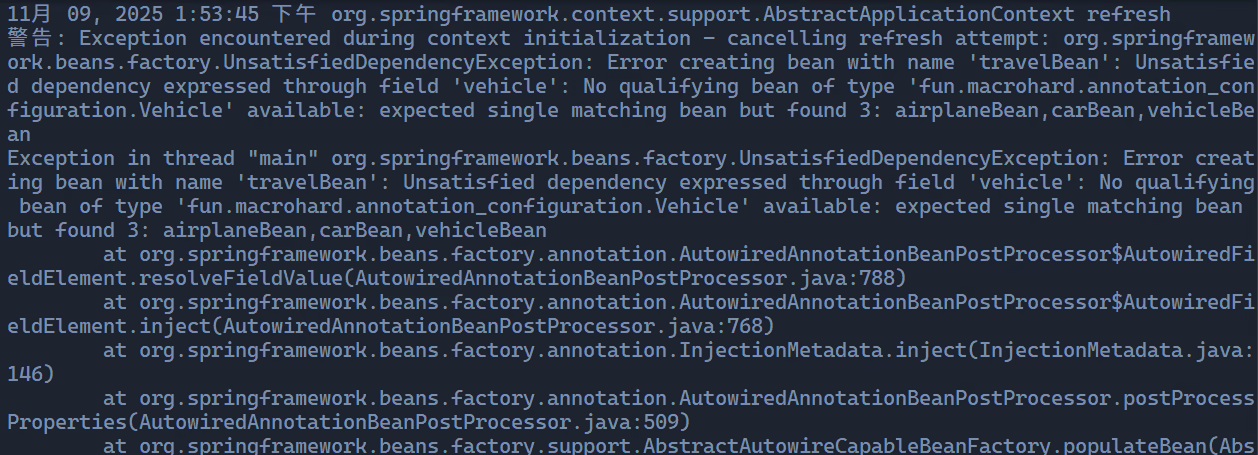
@Autowired 自动装配失败要解决这个问题,可以使用 @Qualifier 注解来指定要注入的具体 Bean,即 根据名称 进行自动装配。例如:
@Component("travelBean")
public class Travel {
    @Autowired
    @Qualifier("airplaneBean")
    private Vehicle vehicle;
}
这样,我们就唯一指定了要注入的 Bean 为 airplaneBean,避免了类型冲突的问题。
@Qualifier 需要与 @Autowired 一起使用,单独使用 @Qualifier 是无法实现自动装配的。

@Qualifier 指定注入的 BeanJSR 330 标准
JSR 330 是 Java 社区制定的依赖注入标准,Spring 框架对该标准提供了支持。JSR 330 定义了一组注解,用于标记依赖注入相关的信息。主要包括以下注解: